Beginner's Guide: Preparing to Machine Quilt


Preparation, Preparation
Many people are afraid to machine quilt their quilts on their home sewing machine, because they think it's too difficult.
Not so! Prepare your work space properly and the job's easy.
What about really big quilts? Can you use your domestic sewing machine? Yes you can! You can even quilt big quilts on a home sewing machine. That's a king sized quilt in my Bernina™ 440QE.
Let me (Jan T Urquhart Baillie) share my tips for preparing to quilt by machine.
What Will You Learn?
I'll show you what you need to be aware of, and how to assemble your equipment, so that machine quilting won't be a chore.
But first, test your knowledge about machine quilting in the quiz below.
No penalties for incorrect answers, it's just for you to see what you already know (or don't).
Test Your Machine Quilting IQ
view quiz statisticsWhat You Need
To Make Machine Quilting Easy
- The manual for your sewing machine
- Silicon furniture polish and lint free cloth
- Extra table/bench for the left side of the machine
- The flat bed table attachment or optional extra wide table attachment for your machine
- Gas lift chair
- Good lighting
- Quilting needles for your brand/model of sewing machine
- Quilting/darning/free machining foot for your machine
- Thread for the top of the quilt
- Thread to match the fabric on the back of the quilt
- Marking tools
- Clear acetate and permanent OHP marker
- Quilters' gloves
- Kitchen timer and right shoe off
- Relaxing music. No Metallica!
The Manual and the Furniture Polish
1 and 2 of what you need
In your sewing machine manual there will be a page or two about maintenance or cleaning of the machine.
- Get the book out and find the page.
- Follow the steps to clean it.
- Remove the needle and dispose of it (in your domestic sharps box).
- Remove the throat plate to expose the feed dogs.
- Use a toothbrush to clean the area under the feed dogs, it will be full of lint from the cotton fabric and threads quilters use.
- Take out the bobbin case and if there is one, the race.
- I bought an attachment for my vacuum cleaner that is designed especially for cleaning computer keyboards and is excellent for cleaning the sewing computer. (That's what my manual says. VBG)
- Carefully wipe the area with a lint free cloth, and put one drop of oil into the race. Some machines don't need oiling, so read the book! (See picture below.)
- Replace all the bits you took off the machine and set it up for work.
- Take a lint free cloth and spray the furniture polish ONTO THE CLOTH not the machine, and polish the bed of the machine and the table/s around it.
The reason?
To make the work surface slippery so the quilt moves around easily for you while you work on it.

Service Your Machine Every 5 Bobbins
Above you see me wiping the bobbin race in my own machine.
Below is a video about how to service a Bernina™ machine. Search YouTube® for a video about cleaning your brand and model.
Tables
3 and 4 of what you need
As well, you need to polish the surface of your flat bed table or your extension table, and also the extra table you are using at the left side of your sewing machine.
My friend uses her adjustable ironing board for the left side. She tapes plastic garbage bags on to it for slip, and adjusts it to the same height as her work surface.
The reason for the table at your left is so that the weight of the quilt is supported as your work, to eliminate drag on the needle.
If the quilt is especially large, then you may also need a table behind your work area to prevent the quilt dropping off the edge and causing drag from the back.
Lights, Chair, Action!
items 5 and 6
You need good lighting when you are quilting. If the light in your work space isn't good, then bring in a lamp without its shade, and insert a bright globe to illuminate your work.
If you want, you could purchase one of the excellent working lights that are available from quilting shops, and lighting store sometimes carry these too.
Why a gas lift chair? You don't have to have one, but you can adjust these up or down to suit the working height of your table.
Otherwise, you could get a cushion (or two) to get you at the right height for good seating posture.
Your elbows need to be at the same level as your extension table on the machine, so that you don't get tired.
Needles For Quilting
number 7 on the list
It's so important to use the right tool for the job, whatever job you are doing.
This is very true in the case of machine needles.
Machine needles are made in different types to do different tasks well.
Examples are:
- Embroidery needles for machine embroidery
- Metafil™ needles for using metallic threads
- Universal needles for — universal uses (duh!)
- Jeans needles for sewing denim
- Wing needles, twin needles, triple needles, fine, medium, heavy needles ...
- And ...
Guess what?
Quilting Needles!
Just what we need.
Why Does It Matter?
The scarf, the shank, and the eye of the needle are different in each type, and you will get much better results and less frustration (yay!) with the correct needle for the job.
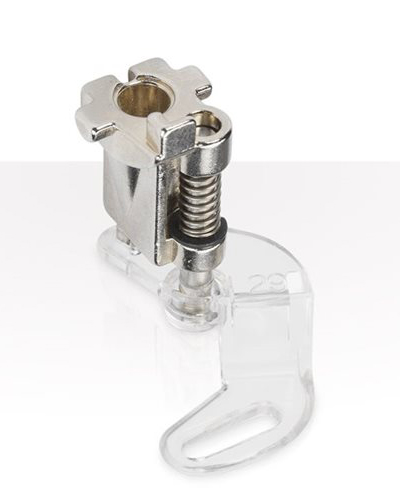
Machine Presser Feet
8: halfway down the list!
Most brands of machines have presser feet which are especially designed for free machine work, whether it's darning, quilting or embroidery.
The tasks are very similar in that they have the feed dogs down, and you control the speed and stitch length. For quilting, see your manual or your dealer and get the foot that is recommended for your sewing machine model.
A quilting foot works by a spring (sometimes visible, sometimes not) that is operated by an arm or finger that is placed above the needle clamp — the screw bit that holds the needle in — and goes up and down with the needle.
They have clear oval or round bases, steel horseshoe or ring bases, and when they come down with the needle, the base of the foot acts as a tiny hoop to hold the work while the stitch is formed.
Thread, Thread...
number 9 and number 10
Thread for quilting a quilt can be cotton, if your quilt is 100% cotton, but it can be whatever you fancy also.
For my art quilts I use rayon thread a lot because I like the sheen and the thread is very subtle on the surface because it so fine. For my everyday or utility or bed quilts I use 100% cotton, so I use the same type of thread.
My favourite thread for quilting is Superior® Masterpiece® or Bottom Line®, but any 40 weight thread is excellent. 30 weight is good, but makes a heavy line, and may work for some quilts.
Thread colour can match both top and backing of the quilt, can match with the top only (same colour in the bobbin), or contrast with either or both.
Marking Tools
point 11
Mark your quilt with lead pencil and you'll rue the day forever.
All the claims made about fabric erasers and wash out markers have little substance. I have tried almost every marking tool there is, until I found my favourite.
If I need to mark, I use a chalk liner which is available at quilt shops and haberdashery stores. The white chalk brushes off and no permanent marks remain. I can even see the lines on unbleached calico (muslin).
Don't use the blue wash out pens, or the fade away ones. There have been some monumental disasters from these pens.
Clear Acetate and an OHP Pen
the twelfth thing
OHP stands for overhead projector and the pens sold in stationers especially for that purpose are available in a permanent version. Don't be tempted to use a non-permanent one, because you can easily transfer the marks to the quilt.
Then see how not non-permanent the marks will be!
Clear acetate sheets are wonderful for trying out designs on the quilt before you quilt. These sheets are sold in packs at stationery stores for use as book covers for presentation folders.
To Use Acetate Covers For Your Designs:
- Place the sheet on an area you want to work out a design for, and mark on the acetate some guidelines for placement of the finished design.
- Use paper and pencil to draw your intended design and place the acetate over that.
- Refine the size, shape of the pencil lines so they fit within the guide marks.
- When you are happy with your design, trace it onto the acetate.
- Position it on the quilt to 'audition' the design as quilting stitches.
Ladies Wear Gloves at Work
Item 13
Not for safety, though.
It's not easy to move a quilt through the machine with just your hands. Gloves produced to help with this make it very easy indeed. There are several types available, but my favourite is Machingers® as in machine fingers.
These gloves have latex tips which grip the quilt and let you move it with flat of your hands, instead of having to grab it to move it.
Me in My Machingers

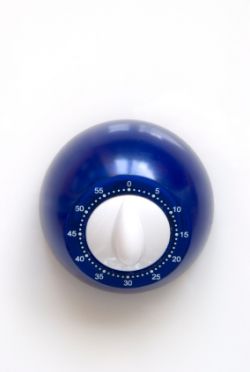
Kitchen Timer, Shoe Off, and Music?
14, 15 all set to go
Are we going to boil eggs, or dance?
The timer is so that when you start quilting, you will set it for 30 minutes and when it goes off, you will get up and do something else for an hour or so. Your neck and shoulders will love you for that.
And the Shoe?
If you remove your shoe, you will have much more control over te foot pedal. The sole of a shoe is stiff and you can't 'feel' the pedal.
The Music is to Set a Rhythm to Work Along With
Years ago when I was teaching accounting subjects at TAFE, my confreres who taught typing used to play relaxing music so that the typists could develop a nice even rhythm.
I borrowed their idea for my quilting students.
Let's Get Quilting!
You can do it now.
More of My Quilting Tips for You
- What Patchwork Quilters Need in a Sewing Machine
Not sure which one is best? Everyone you ask will tell you a different brand, but I am going to tell you what the essential features are that mean you can make great quilts in the easiest way. - What is stipple quilting?
Let Jan T show you her best tips for getting great results when free machine quilting. It's not hard at all. - What can you do with a 'walking' foot?
A 'walking' foot for your sewing machine is essential if you are a quiltmaker. This foot has its own feed dogs to move the top layer of fabric, while the machine's feed dogs move the bottom latyer
© 2009 Jan T Urquhart Baillie


