Electric Quilt tutorial: From photos to fabric to quilts


Let's get started
If you've ever wondered how quilters got photos onto the fabric in their quilts, wonder no more.
Let me show you how simple it is using readily available materials, Electric Quilt and your computer.
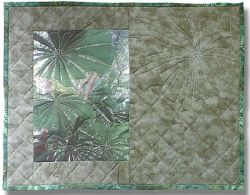
In the detail at left, I used pictures placed inside a heart shaped frame and then printed the photos to use in the Healing Hearts quilt
I'll show you how to get the photo into your computer, how to get the picture into Electric Quilt, how to print photos onto fabric that is then ready to be used in your next quilt.
Quick Bonus Tutorial
Using the new image worktable: Part 1

There's a new version of Electric Quilt now
Image editing is easier in EQ7
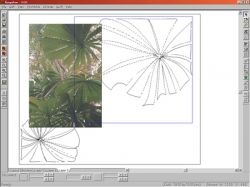
The Image Worktable is accessed form the top menu.
Once in the worktable, click the Import Image button, or choose Image > Import Image from the top menu.

Manipulate the image
Inside EQ7
Play with the colours, or use some of the nifty new features in this version of Electric Quilt

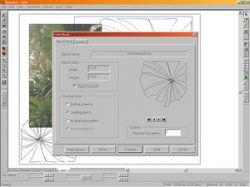
Apply some symmetry
To your photo
I used this quilt photo to get great new images for my project.
The default circular symmetry setting
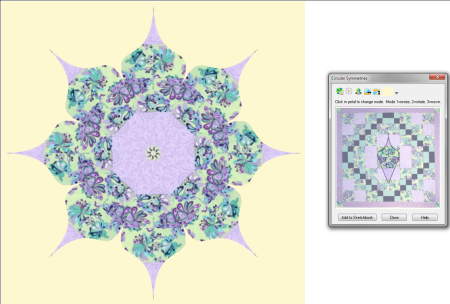
With a new background colour - same settings

Different petal shape - same photo, same background

Tutorial
Photos into Electric Quilt 4, 5 or 6 - Part 1

What you'll learn
to design a place mat with a picture from your trip
You will learn how to:
Get the photo into your computer
Get the picture into Electric Quilt
Print photos onto fabric
Use the image to trace in EQ for a quilting stencil (or applique templates)

What you'll need
for designing
Your computer, your printer, and the special fabric for printing onto.
Electric Quilt software, to trace the image for a quilting stencil. (You could also make the tracing into an applique pattern. Bonus!)

Photos from camera to quilt
A How To
My book, A Moment In Time, co-written with my daughter Angela, tells how to use photos on your quilts — how to get them into the computer and how to use different products to print them on fabric.
Since the book was released, an award winning product has reached our shores and I have been playing with it. Called Color Plus fabric, it is extremely simple to use and the hand of the fabric is beautiful after printing.
Also since then, Electric Quilt has started to sell its own fabric for printing images onto.
I am going to show you how to design a quilt or applique pattern in EQ from your scanned or digitally taken photo.
Getting the picture into the computer
Camera or scanner
Picture taken with a digital camera
Set the camera to take the best quality photo if you are going to print onto fabric. Photo paper for your printer is a bit forgiving, but fabric is already textured, so you need the best shot possible.
Once you have taken your picture, you need to either plug in the USB cable and connect to the computer, or take the little memory card out of the camera and plug it into the port on your printer or your computer.
Usually the software that brings the images in will load automatically. Save the picture(s) as your software directs you — often in My Pictures, in a dated folder.
Photographic prints
Using your scanner if you have one, scan the photo at 300 dpi. Save it as a tiff file, so that it prints at the best resolution for your fabric.

If you don't have a scanner, and you want to use an old photograph, you can take a picture of the photo with your digital camera.
Edit the picture in the image editing software that you like best.
I use Adobe Photoshop®, but you may have CorelDraw!® or PaintShop Pro®, or whatever came with your camera or scanner. There some very good free image programmes available on the Internet, such as Picasa from Google, or GIMP.
Resize the image
If you have used a digital camera, then the image is probably about 20 inches wide, and a 72 dpi jpeg, and should be resized to be the size you would like to use on the project.
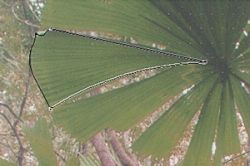
In my little quilt, I wanted to use an A4 sized piece of fabric, so I changed the resolution to 300 dpi (best output for printing), and made the size 71/2in by 10in. I then saved it as a tiff for printing.

Fan palms at Captain Billy's Landing, Qeeensland
What to do to resize it
Because all image editing programmes are so different, I won't show you what I did, but I'll explain where to look.
You need to find a command in the menu that will let you scale or resize your image. Start by using the help file — click Help or press the F1 key on the keyboard — and search for Resize image.
Follow the instructions for your own software.
Getting the picture onto the fabric
Print it out
Color Plus fabric, which I used, comes in various sizes and types, including broadcloth and silk, and comes already attached to feeder sheets of paper, making it ready for printing.
Just sit the fabric in the paper tray in the normal fashion and use a plain paper setting. Set the output for best quality and print.
Peel off the backing paper after printing and rinse the fabric in cold water for 10 seconds, and let dry.
When the lawn I used was dry I pieced it into the quilt and was really surprised at the soft 'hand', and the vibrancy of the colour. Compared to all the other products I have tried, this fabric picture was the softest, and simplest.

I have not tried (to date) the fabric in the photo, which is one of The Electric Quilt Company's fabrics for printers.
They have several fabric types, and as the rest of their products are always top-drawer, I suppose this is too.
Where you get it - You can get what you need on Amazon
Best buys on Electric Quilt software and books and printables.
Tutorial
Photos into Electric Quilt 4, 5 or 6 - Part 2
Getting the picture into EQ
4 or 5 or 6 to trace
While still in your image editing programme, and when you have saved your original photo as a tiff for printing onto the fabric, save a copy of it as a Windows ® bitmap (.bmp), with 256 colours.
This is all you will need in EQ for tracing.
Note: If you have EQ7, there are several options for file types. If you have EQ6, you can bring in a jpg file.

1. Start EQ.
2. Start a new project and go to the Block Worktable.
Block > New Block > Patchdraw.
3. Block > Import for tracing.
4. Browse to where you saved your picture as a bitmap, click on its name, and click on Open.
EQ will then drop the picture into the worktable.
Note: EQ6 has changes in this area - Jan T
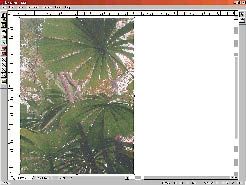
Resize the image to fit the block space
Notice that there are now three tabs on the bottom of the screen.
Click once on the image and hover the mouse to the top left corner until the cursor changes to a diagonal double headed arrow.
Click again over the arrow and, holding down the left mouse button, drag the corner down towards the bottom right hand side of the screen.
If your picture is rectangular, then change the block drawing board size to suit.
Continue to click and drag to resize until the block fits into the block outline on the screen.
Before you begin the tracing process, please go to the exercise called Drawing an applique dove on page 180 for EQ5 and 134 for EQ4 in the Design Cookbook, or pages 99-100 in the EQ6 manual, to familiarise yourself with the tools you need to trace a picture.
Once you have done that exercise, you can begin your tracing of your photo.
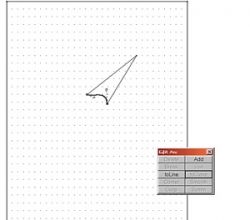
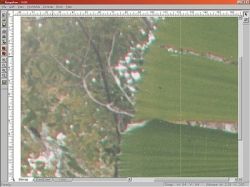
Start to trace your photo
Choose a shape from the simple shapes tool (in the flyout menu under the shape tool icon) that suits the shape you are trying to trace. I used a triangle.
Using the skills you learned in the dove exercise (page 180 in your Design Cookbook), reshape the patch until it represents the part of the photo you are tracing.
One way to see what you are doing is to toggle the photo on and off by clicking the little icon with the 'landscape' on it. You can see which node you are editing, and that will be easier for you.
Great tip — clone the patch
Once you have achieved the first patch, you can save time by cloning that one to make more of the same and edit them to suit your photo.
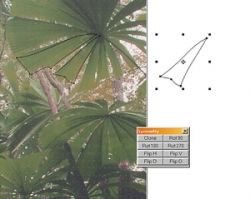
Click on the Select tool at the top of the toolbox on the right hand side, click on the patch and right click. Choose Symmetry > Clone.
I have moved my duplicate (clone) out to the side of the block so it is easier for you to see.
Using the Select tool, click on the new cloned patch and move it over the next area you want to trace and edit that patch to suit.
Continue until you have the whole block traced.
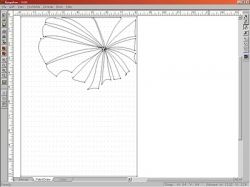
The background patch for the block is there by default, and if it is to be used as a quilting stencil or applique motif, that wouldn't be desirable. You will need to remove it.
Using the Select tool again, click on the line at the edge of the block and press the delete key on your keyboard. Save the block.
Note: In EQ6/7, you can draw motifs direct, with no background. Use this if you have that version.
Tutorial
Photos into Electric Quilt 4, 5 or 6 - Part 3
Design your quilt
The fun part!
From the top menu
1. Worktable > Work on Quilt
2. Quilt > New Quilt > choose your style from the list.
Mine was Custom (Country) Set
3. On Layer 1, using the Set tool from the right hand side toolbox, lay out your quilt. In EQ5 you can use a photo as a block. (See page 162 in the Cookbook). In EQ4 you need to place a blank block as a placeholder. Drag out your block to the size you want and position it with the Adjust tool.
4. Go to Layer 3 (Quilting Stencil layer), drag out the new block you traced. I used mine twice, rotating one.
Now for the best part!
To print the stencil
1. Using the Select tool, click on the stencil block. A highlight will appear around the selected block.From the main menu, choose File > Print> Block.
2. Select Size from Quilt (one of EQ's best features!) > Print Style > Quilting Stencil > Preview.
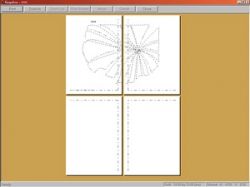
The printer will print as many sheets as needed for the design to be the exact size you need for your design.
(In EQ5 and EQ6 blank sheets will not print.)
3. Print on tracing paper and pin onto the quilt to stitch on, tear away after stitching and ...
Wow!
© 2009 Jan T Urquhart Baillie


")